Thursday 29 October 2020

Art that doesn't cost the Earth

 As mentioned in one of my previous posts, I have been experimenting with various products in order to make my art environmentally-friendly. 

I am now using Natural Coloured Earth Pigments from Celtic Sustainables and mixing them with walnut oil to create my own eco oil paints. 


I learnt that it is necessary to use glass and a muller to properly mix the paints. Here you can see that I have poured out some of the brown pigment on to a sheet of glass and I am adding some of the walnut oil.


At first, it is necessary to use a palette knife to mix the powder and oil together.


I then use a glass muller to properly grind the pigment into the oil.


Once I am happy with the consistency of the paint, I scoop it into a jam jar for storage.


Instead of using the usual cotton canvases, I have decided to opt instead for linen which is more sustainable. 


So far, I have painted a few mini eco canvases on linen and have found it a lovely material to work with. To prepare the canvas for painting, it is necessary to cover it in a layer of clear gesso so that that the paint does not damage the linen fibres. Luckily, naturalearthpaint.com make an eco-friendly gesso, which I have found very effective. 


I used Eco Solve to thin my paint and clean my brushes between colours. However, I have recently discovered that it is possible to simply use more of the walnut oil to thin the paint and just use a different brush for each colour, removing the need to rinse brushes between colours. To wash my brushes after finishing a painting session, I use The Masters Artist Soap, which is also environmentally-friendly.


I have used driftwood to frame my eco paintings and I attach the pieces using environmentally-friendly glue. I prefer to leave the picture without any glass in front of it.


Next, I am going to experiment with painting directly on to wood.

Thursday 1 October 2020

Dorset Otters

This summer, I was lucky enough to have my first close encounter in England with the elusive otter. Their numbers were in huge decline in the 60s and 70s due to habitat loss, pesticide use and persecution. Since the 90s, there has been a huge effort to improve the health of the UK's rivers and, finally, in the last 10 years, this has paid off. Otters are once again found in every county in England, something which hasn't been the case for decades.

During a week away in Dorset, I spent some time walking along the River Stour, looking for signs of otters. I didn't find any footprints on the river banks but did see evidence of spraint (otter poo) on various logs and rocks, so I knew they were around. I spent two mornings from dawn until about 11am walking up and down the stretch of river where I had seen spraint, looking for movement or large ripples. I saw herons, kingfishers and swans, as well as lots of other lovely birds, but spotting an otter was tricky!


It was a beautiful stretch of river and so peaceful at dawn. Once other people started to arrive, including dog walkers and joggers, I thought my chances of seeing an otter were very slim. However, luck was with me on the first morning as I spotted a mother and three cubs swimming together down the river. They were very fast moving and I had to almost run along the riverbank to keep up with them. Every now and then they would stop to fish or play and I would try to capture some photos. They were completely unbothered by my presence and seemed used to noisy dogs and people. I followed them for a long time and had some lovely views, but struggled to get any good photos. 


On the second day, it wasn't until 10am that I saw any sign of the otters. This time, I heard them before seeing them. They were squeaking away at each other and I only caught sight of the mother and two cubs. As I waited by an old tree that created a lagoon with its long, dangling branches, one of the cubs (quite a mature cub) popped up right in front of me within this patch of calm water and rolled around on its back, looking up at me full of curiosity. It was a magical moment that I will never forget and I was lucky enough to capture a shot. 

I would have loved to spend more time in Dorset watching these otters but, sadly, I had to return home to my county of  West Sussex. I hope to go back next spring.

Sunday 9 August 2020

Fox Family

During lockdown, I was lucky enough to have a magical experience with foxes. I often look for fox dens and badger setts when I'm out walking in the woods and, upon finding a likely candidate, I put my trail camera on a nearby tree and come back the next morning to see what has been captured. I collect my trail camera and put the memory card in my laptop full of excitement. More often than not, I am met with huge disappointment!

However, you get lucky when you least expect it! One night, I put my trail camera on a tree near a badger sett. I suspected it was a disused badger sett so wasn't very hopeful. Imagine my delight when I saw this footage:


At last, I had found a fox den! I went back to the same area the next evening and hid in my pop-up camo hide. That first evening I was rewarded with a wonderful experience as I saw the cubs suckling from their mother. They were not in the least bit bothered by my presence. As well as taking some photos, I also took a quick phone video to capture the moment:


The poor vixen could barely stand with all these hungry mouths jabbing at her!

In this picture you can see she has a total of 5 cubs. Sadly, after the first week, I only saw 4 cubs. Mortality among fox cubs is, unfortunately, very high. 
I returned each time I had a free evening and enjoyed watching the cubs grow up. I attempted to get different perspectives by lying in the grass and hiding among the brambles (not the most comfortable experience ever!) 

These foxes were very much rural foxes and looked in excellent condition. Urban foxes are much less timid and will often scavenge from bins. Foxes are not fussy eaters at all and will eat any small mammals and birds as well as frogs and berries. They will even eat worms if they have to! The main prey that I saw this mother bringing to her cubs was rabbit. It is common for both the vixen (female) and the dog (male) to look after the young but I never saw any sign of the male.


It was delightful to watch the cubs play-fight and explore. You could see that every little adventure was all part of their learning. The cubs had very distinct personalities. One was very shy and would run back into the den at the slightest sound. Another would wander very far from the den to explore, and another was always wanting to jump on his siblings!


The cubs grew up very quickly and before long, there was no sign of them at the den. Fox cubs are almost always born in the spring and by September/October time they are usually fully independent. Often they will go off and find their own territories, but, interestingly, some will stay behind and help their mother rear the following year's litter. I will certainly visit this den next spring to see whether it will be used again. 


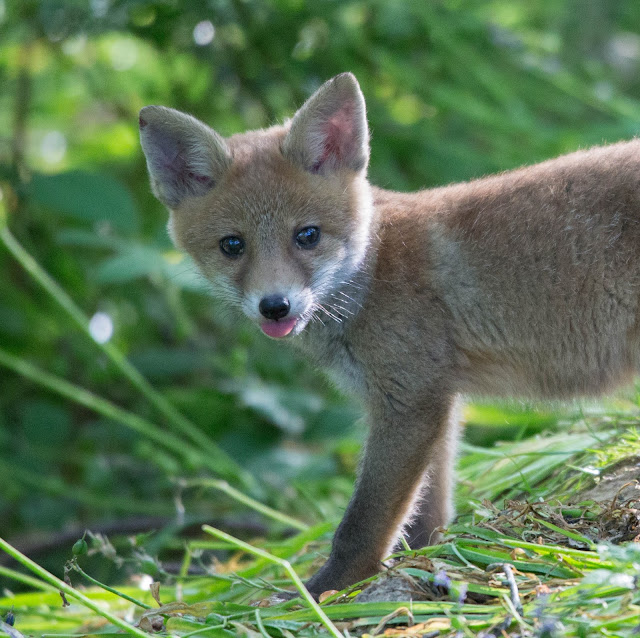
You can see in this picture how the snout area gets much longer as the cub grows up, and the fur becomes a more reddish colour. This no longer looks like a cub, but more like a young adult. 

To see more photos of this fox family, take a look at my main website, Instagram and Facebook. 

Trail cameras are truly fantastic. You never know what you might capture. They are not as expensive as you might think - why not try one in your garden and find out who visits it at night?! 

Feel free to let me know what you discover!


Thursday 28 May 2020

The progress of the blue tit family

Earlier in the year I showed you how we made a camera nest box. Luckily, some blue tits decided to nest in it and we have been closely watching their progress.

They had several attempts at building the nest. We would look at the camera one day and see it full of nesting material and then the next day it would be empty again! We thought they would never finish their nest! 

However, they made a beautiful nest in the end and the female laid one egg a day for 10 days. 10 eggs is a huge number and we suspected that not all would hatch.


Once all ten eggs were laid, she began incubating them. They were very dedicated parents, with the male regularly coming to feed the female as she kept the eggs warm. Here she is incubating:

.

On 3rd May, the eggs began to hatch. They did not all hatch at once, but, over a period of 2 days, 6 of the eggs hatched. The babies were tiny, pink, featherless and blind. 
.


 The parents have been regularly feeding the young with caterpillars from the nearby oak tree as well as food from our birdfeeder. Their rate of growth was incredible - they looked bigger every time we look at the camera! They very quickly developed tufty feathers.


.
Sadly on 18th May, it became clear that 2 babies had not survived and the parents must have removed them from the nest. Only 4 hungry mouths remained and we were hoping that they would all make it to adulthood.

A few days later, we were then devastated to see that one of the remaining four had also died and was still in the nest as it was now too heavy for the parents to lift out.

Eventually on 24th May, three of the babies fledged. However, they were not yet able to fly and were just hopping around on the ground. One fell prey to a cat but I can happily say that the other 2 made it and can now fly.


Here they are visiting the bird feeder. You can see that they are still asking the parents for food but can also feed themselves now - they are doing well! The babies still have yellow faces, unlike the adults whose faces are white.


Monday 13 April 2020

Build your own Bat Box


An often overlooked animal that might visit our gardens is the bat. In the UK we have 18 species of bat. Sadly, many of these species are in decline.

One thing you can do to help is to build a bat box.

There are several different types of bat box. Some are designed for different species of bat and some are specific maternity boxes.

I decided to follow the instructions at the bottom of this Bat Conservation Trust information pack to build a couple of Kent bat boxes. This is a popular and successful design. Why don't you give it a try?

The most common and most likely to use these boxes in my garden will be the Common (45kHz) Pipistrelle and the Soprano (55kHz) Pipistrelle.

Here are some photos of me making my bat boxes. I am no DIY expert and I was able to manage it, so anyone can!

It is very important that the wood you use is 'untreated'. You can find this easily in a hardware/DIY shop.

 It is important to etch grooves into the wood for the bats to cling on to. I just used the blade of a power saw very lightly.


 Each entrance hole should be no more than 15-20mm wide. Bats like to be cosy! Just as in a bird box, the size of the entrance determines which species will decide to utilise it.


Make sure you put a lid securely on top!


To increase the lifespan of the box and to make it a little cosier for the bats, I added an outer coating of leftover pond-liner from our pond. This makes the box more waterproof!


Ideally the bat box should be placed facing South, but this was not possible on our house. It is important to make sure that they are not placed near artificial lights that might be on at night (e.g. street lights) as this confuses/disturbs them. We have placed it facing East. We will see whether it gets used!


Sunday 1 March 2020

Nestbox Camera

As spring approaches, it is time to ensure that any nestboxes you have in your garden are clean and in good condition, ready for use by a new nesting pair.

We have decided to add a camera to one of our nestboxes. I'm very much looking forward to seeing baby birds being raised this spring!

Conveniently, the box that has been used most in the last few years is close to a power socket and within range of our wifi. Therefore, we decided to use a solution that streams video over Wi-Fi so that we can access it from most of our devices anywhere in the house. We used a Raspberry Pi Zero W and a small, compatible infrared camera with Raspbian and UV4L.

As in previous years, we are expecting blue tits to nest in this box, as the size of the entrance hole is best suited to this species (25mm).

We attached these devices to the inside of a plastic container (just upcycled something lying around the house). This was to help with waterproofing.

Then we built a new wooden compartment to house the camera, replacing the lid of the current nestbox.


We also covered it with leftover pond-liner for extra protection from the elements.


We put the box back on its original tree and fed the power lead for the Raspberry Pi through the window of our summer house into a power socket.


Now it's time to wait and see what will happen! I will update you with progress.