Thursday 7 November 2019

Environmentally conscious art

When I first started painting, I used to paint in water colours and acrylics. Once I discovered oil paints, I was hooked. You can create much more texture and work on detailed blending as the paint is slow to dry. I always found it quite unpleasant having to use solvents and found a nicer alternative called Zest-it.

However, I was shocked to discover recently how bad the fumes from the paints themselves are for your health and the environment. As a keen environmentalist, I felt so stupid not to have thought of this before. I had been changing many areas of my life to help the environment, but hadn't considered my painting.

I did some research so see what possibilities there were and I discovered a website called https://www.naturalearthpaint.eu/

This company use "pure, natural earth and mineral pigments and organic ingredients to make completely safe, sustainable, and beautiful art supplies for fine artists."

The natural pigments are then mixed with walnut oil to create oil paint. I was skeptical as to whether the paint would work in the same way and have the same effect as normal oil paint but I decided to buy a starter pack to try them out.

I am delighted to say that I am a big fan and will certainly be buying more products from them!

I will take you through the process of mixing your own oil paint.

The paints arrive in the form of powder. Here is an example of a colour I use frequently for painting wildlife:


I then gathered all our spare jam jars, ready to use them to store my paint.


You can either mix a little bit of paint at a time, by pouring out some powder and mixing in some oil, or you can convert the whole lot into paint straight away by filling a jar or tube with the powder and then adding the correct amount of oil.


Here is the yellow ochre powder in the jam jar. I then added some walnut oil which also came in the starter pack.


I mixed the oil and the powder together, adding more oil to get the correct consistency. The paint does not look as smooth as regular oil paint (maybe that's my bad mixing) but when used for painting you cannot tell.


I tried out the purple paint first. I mixed the purple paint before the other colours and left it in the jar for a few days to make sure it wouldn't dry up. I opened the jar and the paint was as fresh as ever. I painted this flower to test out the paint. I wanted to see how well it created texture and allowed for blending of colour. This is obviously not a finished painting but I am very satisfied with the paint. You cannot tell that it is not normal oil paint apart from the fact that it doesn't smell at all - victory!


It turns out that Zest-it was also not very good for the environment. Luckily, this starter pack came with an eco alternative - eco-solve. I am also very pleased with this.

I am absolutely delighted with these paints and I now intend to make all aspects of my art environmentally friendly. I would thoroughly recommend these products. However, it is much more cost effective to buy the colours you want in bulk rather than buying the starter pack.

Let me know if any of you have any tips for being an eco artist.

Thursday 10 October 2019

Your garden is more important than you think.


Every garden, no matter how big or small, has the potential to help our wildlife. They are in fact vital as we continue to decimate habitats through building and expansion.

In this blog post, I will give some tips for how to make your garden as beneficial as possible for wildlife so that we can try to lessen the damage we do as a species.


1) Insect-friendly flowers:


'Grow wild' Flower seeds - Flickr - gailhampshire.jpg


When deciding what to plant in your garden, why not plant species which are beneficial to bees and other insects? It is usually mentioned on the label/seed packet if plants are particularly insect friendly.

Alternatively, the easiest and laziest of ways to help wildlife is to allow your garden to go a bit wild. Just don't mow your lawn! Or, if you prefer, leave a section of your lawn unmown. You will be surprised at how quickly nature takes over. This simple action will create a habitat for many plant and insect species. Before you know it, a number of interesting wild flowers will grow by themselves.

If you want to go a little bit further, why not plant some wildflowers which are particularly beneficial to bees, butterflies and other insects? You can actually buy packs of ready-chosen 'wild meadow seeds' or 'plug plants'.

You will see benefits very quickly - have a read of this article:
https://sussexwildlifetrust.org.uk/news/my-front-lawn-plant-it-and-they-will-come?utm_source=Sussex+Wildlife+Trust+Newsletter&utm_campaign=a60f073b83-Aug2019_Mem&utm_medium=email&utm_term=0_9f7e3b5ad3-a60f073b83-293334637


2) Give birds a helping hand:


Give the birds somewhere safe and easy to nest by putting up bird boxes in your garden. There are many places to buy bird boxes, but you could save money by making your own (this is what we did):

We decided to make a blue tit nesting box using the RSPB nest box guide. With a little modification this can be used for other bird species. For example, great tits require a 28mm diameter entrance hole.

Be sure to put them in places that are sheltered and safe. Some birds will like to nest high up and others near the ground.

Feed the birds. Put up bird feeders - you can put seeds, nuts or suet balls in these, helping birds get through the winter and to feed their young in spring. Again, make sure you put them somewhere safe near a tree or bush so that birds don't become easy targets for cats!


3) Make a pond:


Not everyone has room for a pond, but even a small trough or bucket of water is better than nothing.

As well as potentially attracting frogs, dragonflies and other aquatic life, a pond will also be of great help to birds and other animals who will drink from and bathe in the pond.

Here is the pond we have created in our garden. I may do another blog post about how we made the pond.


Notice, we have a particularly shallow end on the right to allow birds and small mammals, such as hedgehogs and mice, to drink safely.


You will want a large variety of plants for your pond. They are divided into zones 1 - 4 depending on how deep in the water they can grow.

This page has a useful guide for how to build a pond, and recommends which species to plant: https://www.wildlifetrusts.org/actions/how-build-pond


4) Make hedgehog passageways:


Erinaceus europaeus LC0119.jpg

Hedgehogs have declined rapidly in recent years. 50 years ago there were more than 30 million hedgehogs in the UK. Now we are down to just over 1 million.

Fragmentation of habitat is one of the major causes of this decline. If hedgehogs could travel more easily between gardens, their habitat would be less reduced.

Solution? Simply make a small hole in the bottom of your garden fence, just big enough for a hedgehog to squeeze through.

Fantastically, it is now law that hedgehog holes be included in fences of new housing developments. This will be a huge help to the hedgehog population. This article explains more:

https://www.discoverwildlife.com/news/hedgehog-highways-to-be-included-in-new-housing-developments/?utm_source=Adestra&utm_medium=Email&utm_content=BBCW&utm_campaign=Newsletter%2025%2F07%2F19_189475_BBC%20Wildlife%20Magazine_Newsletters


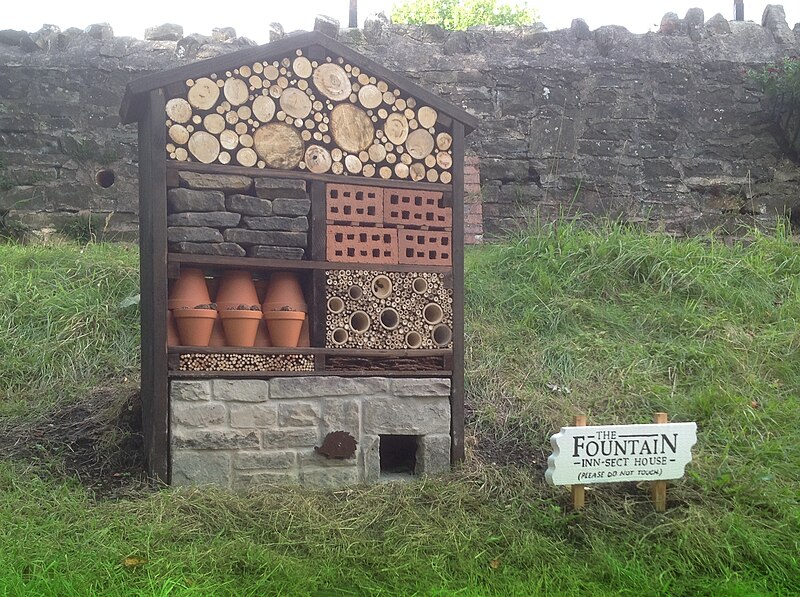
5) Insect hotels/log piles:


Although we may not all like insects, they are an important part of the ecosystem.

You will all have seen bug hotels that you can buy in various shops, but, if you want to save money, all you need to do is to leave a small area of your garden aside for rocks, logs and leaves. This creates the perfect shelter for spiders and insects.

There are also tonnes of ideas online for how to make your own bug hotels. Why not have a look?

https://www.rspb.org.uk/get-involved/activities/give-nature-a-home-in-your-garden/garden-activities/build-a-bug-hotel/

https://www.wildlifetrusts.org/actions/how-build-bug-mansion


6) Avoid pesticides and weed killers:


Try to avoid using pesticides or slug pellets. When a bird or hedgehog eats a slug or snail poisoned by pellets, they too become poisoned, and so it continues up the food chain.

There are all sorts of other negative side-effects from using pesticides. They can be harmful to important pollinators such as bees. It is also worth mentioning that they could pose a threat to us if they find their way into the water-supply or our food.

There are many environmentally-friendly suggestions for keeping pests away from your plants:

Plant species such as garlic or chives to deter slugs. Slugs are repelled by these, so if planted around those you want to protect, will make a great barrier.

Cultivate sacrificial plants. Plant something slugs love in one corner of the garden away from plants you are trying to protect. When you see them crowding around this plant, pop them in a jar and take them out of your garden.

Try spreading coffee grounds around the base of plants you want to protect. This deters slugs and snails.

Many of us use weed killers to get rid of unwanted plants, but do we stop to think about what they actually do? Some of these chemicals can linger in the ground for months and could leach into the roots of nearby plants and even enter the water table.

This site has some great tips for getting rid of weeds without harming the environment: https://www.gardenorganic.org.uk/weed-management

Whatever pest you are trying to deter, there is usually an alternative suggestion. Just Google search ideas before you go spraying any nasty chemicals in the garden!


Feel free to tell me in the comments any of your ideas for helping wildlife in your garden.

Sunday 18 August 2019

A trip to see the seal colony at Ravenscar.

.
Early one morning, during a trip to Yorkshire, I decided to visit the village of Ravenscar in the hope of seeing the resident colony of common seals.

Ravenscar is a strange 'would-be' town. At the start of the 20th century, it was set to become a major holiday destination similar to Whitby and Scarborough, but due to a variety of reasons, including the difficult and steep hill down to the beach, it was a flop and developments were abandoned.

I followed the route down to the beach from Raven Hall and, before long, I could see the sea. The view was beautiful and it was a lovely warm day but, in places, the route was steep and slippery.


I could hear the musical wailing calls of the seals even before the colony came into view. It is easy to see where the myth of sirens and their songs came from.
The tide was in and the colony was a fair way out but I headed down to the base of the cliffs to get a closer look.

I was surprised to see a number of seal pups (already quite grown-up) amongst the rocks close to the cliffs. They look so ungainly on land, but once in water they are such graceful creatures. I made sure not to get too close to the pups as I didn't want to frighten them. If they raise their head and snort, it's a sign to back off. They seemed quite curious by my presence but were not disturbed.

To get a little closer for some images I crouched low and hid behind rocks.

None of these pups were with a mother and people often mistake young seals lying around alone as abandoned and in need of rescue. However, both common and grey seal pups are weaned at around 3-4 weeks old, and at this point, the mother leaves the pup to fend for itself. They are often reluctant to enter the water and may stay on the beach for a couple of weeks until their hunger forces them into the sea to find their own food.

I think I'll call this image, 'Doh!' (Homer Simpson's catchphrase if you weren't sure). You can see proper full-sized versions of these images and more on my website.
I filmed a young seal heading into the water. Not very graceful!

A few years ago I was lucky enough to swim with wild seals in the Scilly Isles and I took my underwater camera. You can see how much more streamlined and acrobatic they are. Seals are very inquisitive and playful and will come up to investigate you if you are in the water with them.


Ravenscar is also interesting from a geological point of view. It is an example of a 'peak fault', with rocks of different ages on opposite sides of the path down to the beach. There are additionally hundreds of fossils visible in the beach rocks, such as this ammonite.

As I climbed back up the hill, I noticed how much the tide had gone out in the couple of hours I had been there, revealing the onion-like structure of the dome that had once existed where Robin Hood's bay now lies.


Thursday 18 July 2019

Steps towards plastic freedom!


At long last we are all waking up to the horrendous mess we have made with the invention we were so proud of - plastic.

Thanks to fantastic programs such as War on Plastic and Blue Planet II, we are all very aware of the urgent need to cut down on plastic - particularly single-use plastic.

A friend of mine recently recommended this website to me https://www.plasticfreedom.co.uk/ and I decided to buy a few items to see what they were like.

I bought shampoo, conditioner, deodorant and beeswax wraps (to replace clingfilm).

Continue reading to see my reviews of each of these products.


Shampoo:

The first product I selected was the Beauty Kubes shampoo for oily hair at £9.50. I wasn't really sure what to expect!

Not only is it plastic free, but it is also free of palm oil (the production of which causes a great deal of deforestation) and is vegan.


When you open up the box, it contains 27 little cubes and they smell really nice which is a good sign!

As it was a bit more expensive than my usual shampoo, I was really hoping this would be cost effective and clean my hair nicely as well as being good for the environment.

It did not disappoint! The instructions tell you to crumble one cube in your hand in the shower and add water to make a paste which you then put on your hair. However, I have found that one cube can last 2 or 3 washes. It was a bit tricky mixing it in my hand so instead I now use an old hand cream pot and mix it in there with a little spoon. It is easy enough to split the cubes in two if you want to use less per wash.

At 2 washes per cube, this is about 18p per wash. This is comparable to a standard higher-end shampoo.

It made a great lather on my hair and the smell was really refreshing. It certainly did a good job of cleaning my hair and I intend to continue using it. I thoroughly recommend it!


Conditioner:

I chose the Apple Cider Vinegar Rinse (£6). I must admit I was slightly put off by the name and the thought of putting vinegar in my hair.


However, once again, I was pleasantly surprised. Although it does smell a bit of vinegar when you put it in your hair, once you have rinsed it out you can only smell the other scents in the conditioner. It worked wonderfully to reduce tangles and my hair was very soft and shiny afterwards.

The slight downside is that it is such a thin liquid and it is therefore a bit tricky not to pour too much out at once. You have to be careful not to waste any.

Overall, I would recommend this product too.


Deodorant:

I went for the Lavender and Geranium Kutis Skincare deodorant (£6.50).


Unfortunately, the first thing I noticed was that it smells like mosquito repellent! However, it does work well. I think perhaps I chose the wrong scent. Maybe I should try the grapefruit and mandarin one next time! My boyfriend has been using it and thinks it smells fine so maybe it's just me!

The only other issue with it is that it is not as easy to rub on as a roll-on deodorant. However, as it is not a wet deodorant, you don't need to wait for it to dry.

I am not sure whether I will buy this product again but I am going to try out other options and I will review them here.


Beeswax Wraps:

I ordered a 3 pack of BeeBeeWraps (£9.50).


I ordered quite a small size just in case I wasn't happy with them.

I've now already ordered a bigger size as I have been so impressed with these ones.


My main concern was that they wouldn't 'cling' but when you wrap up an item, the wax sticks together and really does protect the item inside. It is also quite stiff, maintaining its shape.


My bread was kept fresh just as long as it would have been with clingfilm or a normal plastic packet. It didn't even dry out. I have also used it successfully with cheese.


The great thing about these is that they are reusable. I found them very easy to wash with washing up liquid and water and then they worked just as well for the next use.


The only slight negative about these wraps is that they smell strongly of honey so they might make your food smell a bit of honey...but hey - there are worse smells than honey! I will definitely be using these again!

Check out this fantastic website and see how much plastic you can get rid of from your life! I will post reviews of any more products I try out.

https://www.plasticfreedom.co.uk/


Saturday 25 May 2019

A good hare day!


A few weekends ago I was up in Lincolnshire for a family gathering. To my delight, the place where we were staying was very close to an area abundant in wildlife, including (one of my favourites) hares!

Thankfully, I had brought my camera with me just in case. The weather was gorgeous and, as the day drew to a close, I was making plans to get up at the crack of dawn to see if I could nab some good hare shots...

I sneaked out of the house just before 5am as all the 'normal' people slept peacefully!

As soon as I stepped out, I was greeted with the glorious sound of the dawn chorus. I could hear the skylarks singing their melodious descending scale as they danced in the sky.

It was just the right temperature and the morning dew was still glistening on the grass - a beautiful sight in the early sunlight.


From past experience with hares, I knew that the best thing to do was to find a good spot and lie there in wait (hares don't seem to fear humans unless they are sitting or standing). However, no sooner had I set off than there were two hares, soaking wet from running through dew soaked grass, lolloping along the path in front of me! They were quite a distance away but I took some tester shots.


I held my breath and crouched down and waited. Unfortunately, the hares decided to hop off in a different direction. Never mind - a good start!

The morning was full of frustrations as I came close to getting nice shots but didn't quite succeed. Nevertheless, it was peaceful to be out in nature on such a lovely day.


After trying out many locations and not having much success, I came across a long ditch which seemed like the perfect hiding place. I stumbled down and then scrambled up the other side of the bank, getting viciously attacked by brambles. I tried to get myself into a good position with my camera up on the surface but myself hidden. It was very uncomfortable but it soon proved to have been a good idea as two pairs of ears appeared!


I waited with excitement for them to appear for the perfect shot... hoping it would happen soon so I could move into a more comfortable position!

They came closer and closer and clearly had no idea I was there. In an instant my opportunity was lost as a sparrowhawk landed in the tree behind me and I turned to look. Just as I did so, the hares jumped beautifully towards me and then tore off in the opposite direction!

Plenty of other wildlife was around so I did not despair.


As I headed back to the house, I had one more attempt. I lay down on the path (hoping no dog walkers would come past and think I was a bit weird) and waited in front of a gap in the grass. Eventually, my patience was rewarded.


Sadly we had to return to the south later that day. I made a mental note to make sure I return to this great place in August! To get successful shots, you really need to visit a location a number of times.